
Taking a screenshot on your Mac might seem as simple as snapping your fingers, but mastering it can feel like learning a new superpower! Whether you’re a new Mac user or a seasoned pro, this guide will walk you through both basic and advanced methods to capture your screen effortlessly.
Additionally, you’ll learn how to take a screenshot on a Mac and explore Mac screenshot shortcuts and powerful third-party tools that can integrate seamlessly with the best productivity apps for Mac.
Understanding Mac Screenshot Tools
Macs are equipped with powerful, built-in tools that make capturing your screen a breeze. Apple has integrated various methods directly into macOS, whether you are on macOS Ventura, macOS Monterey, or earlier versions.
These built-in features let you quickly screenshot on Mac and even edit your captures without needing extra software. In this guide, we’ll compare the native tools with popular Mac screenshot tools and the best screenshot apps for Mac, such as Snagit, CleanShot X, and Monosnap.
Think of these native options as the sturdy, reliable toolbox that every Mac user has, ready for everyday tasks.
Step-by-Step Mac Screenshots: Unlocking Full Screen, Windows, and More
One of the simplest questions is, how to take a screenshot on a Mac? Apple has made this process straightforward with keyboard shortcuts that let you capture your entire screen, a specific window, or even a selected portion.
- Full Screen: Press Command + Shift + 3 to capture everything on your display.
- Selected Area: Use Command + Shift + 4. Your cursor will turn into a crosshair that you can drag over the desired area.
- Window Capture: After pressing Command + Shift + 4, hit the spacebar to capture a specific window by clicking on it.
These methods are a great starting point if you’re learning Mac screenshot shortcuts for the first time.
Using the Screenshot Toolbar for Advanced Options
Mac screenshot shortcuts are designed to make your life easier. Imagine having a magic key combination that instantly records exactly what you need—no fumbling with menus or applications. Here’s a refresher on some vital shortcuts:
- Full screen capture: Command + Shift + 3
- Capture selected area: Command + Shift + 4
- Capture window with cursor: Command + Shift + 4, then press Spacebar
For those wondering how to screenshot Mac efficiently, these shortcuts work seamlessly across all Mac models. If you ever forget them, a quick peek at your keyboard can be like reading a familiar map home.
Capturing Full Screen, Window, and Selected Area
Each screenshot method serves a unique purpose. Let’s look into this some more:
Full-Screen Capture
This method is perfect when you want a snapshot of everything on your screen. It’s especially useful for capturing presentations or dashboards. When you take screenshot on MacBook with Command + Shift + 3, your Mac automatically saves the file to your desktop by default.
Window Capture
If you need to capture just one window—say, a specific application or dialog box—simply press Command + Shift + 4, then hit Spacebar. Your cursor will change to a camera icon. Click on the window you want, and voila! You get a crisp image of just that window.
Selected Area Capture
Sometimes, you don’t need the whole screen, just a portion of it. Using Command + Shift + 4 allows you to drag and define the area you want to capture. This is particularly handy for grabbing a small piece of information or a specific part of a webpage.
Each method has its charm, and choosing the right one depends on your immediate needs. Remember, these shortcuts are part of Mac screenshot shortcuts that streamline your workflow.
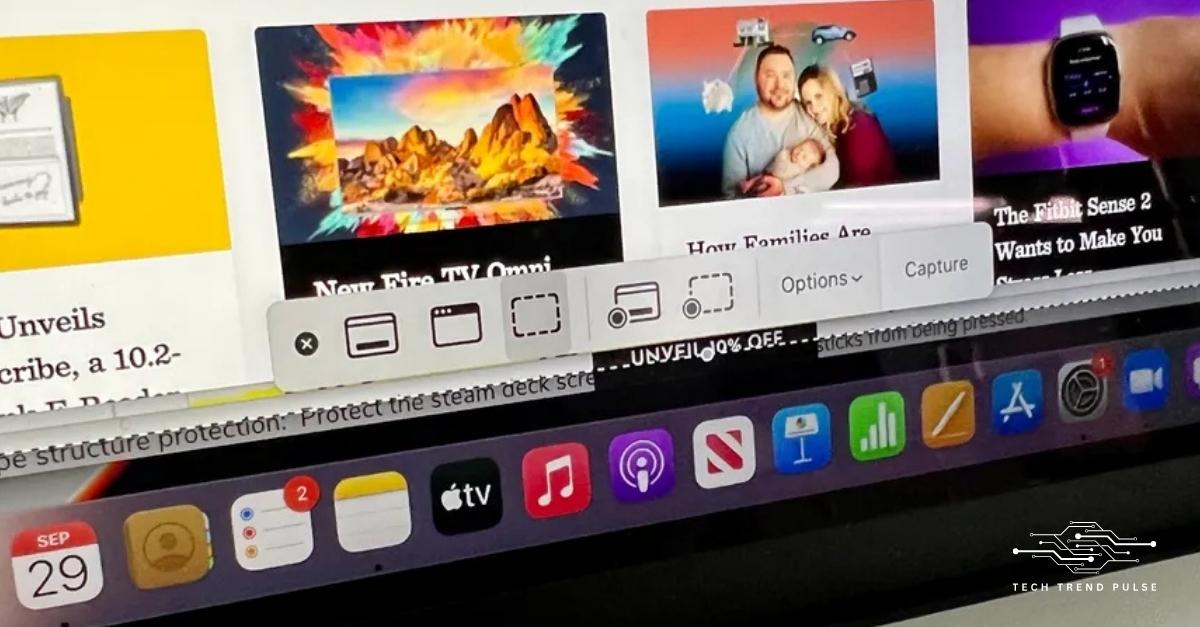
Using the Screenshot Toolbar
For a more interactive experience, macOS offers a Screenshot Toolbar that provides additional options. To access this, press Command + Shift + 5. This toolbar not only lets you capture your screen but also offers options for:
- Capturing Entire Screen, Selected Window, or Portion of Screen: Choose the mode that suits your needs.
- Screen Recording: Record your screen activity, which is ideal for tutorials or presentations.
- Timer Options: Set a delay before the capture to prepare your screen perfectly.
The Screenshot Toolbar is like having an artist’s palette; it gives you various tools to refine your capture and ensure every detail is just right.
Editing and Annotating Your Screenshots
Once you’ve captured your screenshot, the next step is to edit and annotate it if needed. Mac provides built-in tools like Preview for simple edits. Here’s how:
- Open the Screenshot: Double-click the screenshot to open it in Preview.
- Edit Tools: Use tools like crop, highlight, and add text to fine-tune your image.
- Annotations: Easily add arrows, shapes, or notes to emphasize parts of your screenshot.
These steps are perfect if you’re wondering how to use Preview on Mac. They help you edit and enhance your screenshot, making it ideal for presentations or documentation. For many users, these MacBook tips and tricks can dramatically improve how they share visual information.
Saving and Sharing Your Screenshots
Your screenshots are saved to your desktop by default, but you can customize this setting. Want your files in a specific folder? Or would you prefer a different file format? Here’s what you can do:
- Change the Default Location: Open the Screenshot Toolbar and click on “Options” to select a new save location.
- File Formats: Mac saves screenshots as PNG by default, but you can convert them to JPG, PDF, or other formats using Preview or third-party apps.
- Quick Sharing: Use the Share button in the Screenshot Toolbar to immediately send your screenshot via email or social media.
These options ensure that your screenshot on macOS is captured perfectly and organized and shared efficiently.
Using Third-Party Screenshot Tools
While built-in methods are powerful, sometimes you need extra features. This is where third-party apps come in. Let’s look at a few popular choices:
- Snagit: Known for its robust editing and annotation features, it’s a favourite for professionals who need detailed captures.
- CleanShot X: Offers a sleek interface with cloud storage integration, making it easy to share your screenshots.
- Monosnap: Great for quick captures and sharing, this app offers both screenshot and video capture capabilities.
These screenshot apps for Mac offer a range of functionalities beyond basic capture, providing advanced editing, cloud integration, and more. They are excellent for users who need more than just a simple MacBook screenshot.
Troubleshooting Common Issues
Even the best tools can sometimes run into hiccups. If you find that your screenshots aren’t saving or your shortcuts aren’t working, consider these tips:
- Check Your Keyboard: Sometimes, sticky keys or an unresponsive keyboard can cause issues with Mac screenshot shortcuts.
- Update macOS: Ensure that your system is up to date. Apple frequently releases patches that fix bugs.
- Reset the Screenshot Settings: Resetting the settings can occasionally resolve issues if screenshots aren’t saving to the desired location.
- Third-Party Conflicts: Some apps might interfere with screenshot functions. Try disabling them temporarily to see if that resolves the issue.
If you ever wonder why your screenshot isn’t working, these troubleshooting steps should help you diagnose and fix the problem quickly.
Pro Tips for Advanced Users
For those who want to take their screenshot game to the next level, here are some pro tips:
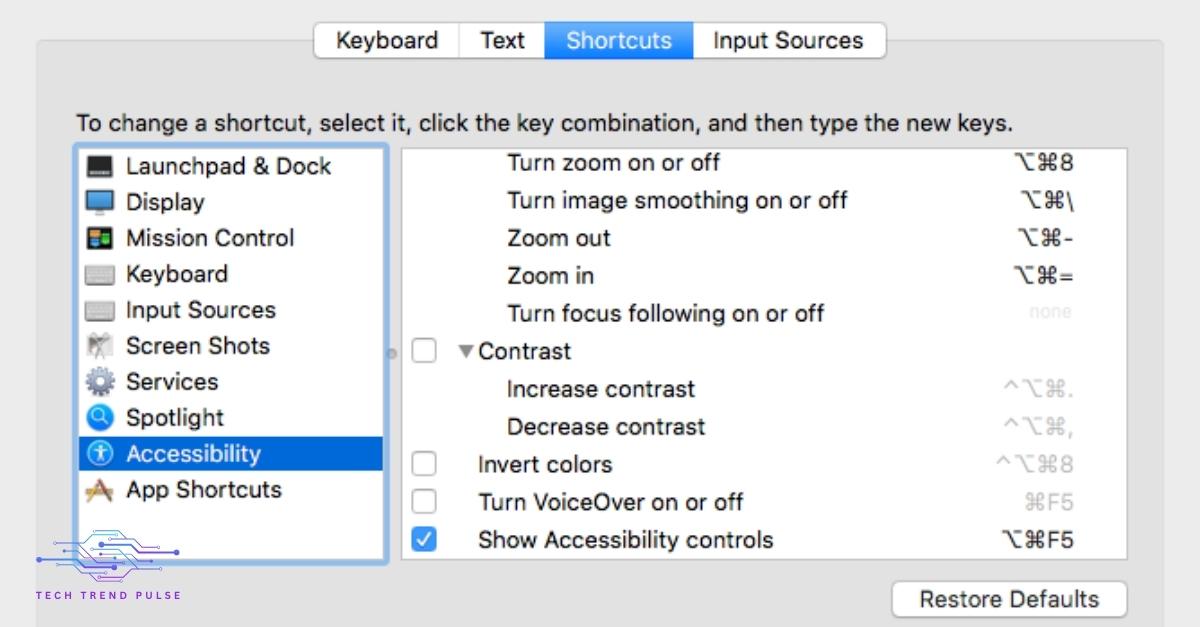
- Customize Shortcuts: You can reassign screenshot shortcuts via System Preferences to better suit your workflow.
- Automate with Scripts: Advanced users can create scripts to move or rename screenshots for better organization automatically.
- Use Cloud Storage: Set your screenshots to save directly to a cloud service, making them accessible from any device.
- Hidden Features: Did you know that holding down the Control key while capturing adds the screenshot to your clipboard? This little trick can save time if you must paste the image immediately.
Think of these as your secret ingredients—a sprinkle of magic that can transform basic captures into powerful, organized assets. These Mac screenshot shortcuts and tricks are perfect for anyone looking to improve efficiency and organization.
Conclusion
Now it’s your turn to experiment and discover the best ways to incorporate these Mac screenshot shortcuts into your daily routine. By following this guide, you’ll not only learn how to screenshot Mac effectively but also gain insight into advanced methods and troubleshooting techniques.
Whether you’re new to the Mac world or looking for fresh MacBook tips and tricks, the step-by-step methods outlined here provide a comprehensive pathway to mastering screenshots on macOS.
Enjoy capturing your screen like a pro and exploring new ways to enhance productivity with these Mac screenshot shortcuts and tips!